Classkit Catalog Api Quick Start Guide
This post originally appeared on Medium.
This brand new web service from Apple allows us to declare and edit our activities outside of our app.
Now teachers will see your activities without having to open your app first, and you can change them without pushing out an app update.
You can Create (or overwrite), Fetch, and Delete.
They also have a development environment, so test it out before going live!
We have 3 tasks:
-
Create JSON that accurately mirrors the CLSContexts in our app
-
Create our JWT for authentication
-
POST to the ClassKit Catalog API
Create the proper JSON
You can examine the specifications for the JSON structure here.
It mostly mirrors our CLSContext, but there’s a couple things to keep in mind.
Apple created the mainAppContext for you when using ClassKit, but in our request we’ll need to create it ourselves. Be sure to have its title match the name of your app in the App Store, or you will get an error on POST.
Given your activity-hierarchy, you’ll need to define the parent’s activity before the children in the contexts array. If you don’t, the web service will reject your request.
E.g. with an identifierPath of [“bundle.id”, “math-group”, “math-jam”], you’ll need to define “math-group” before defining “math-jam”.
For your convenience, I’ve made an Encodable object that produces the properly formatted JSON here: ContextsRequest
This lets us create our full JSON payload like so:
func printJSON() {
    let rootContext = Context(
        data: Context.Data(
            displayOrder: 0,
            identifierPath: [Bundle.main.bundleIdentifier ?? ""],
            isAssignable: false,
            progressReportingCapabilities: [],
            summary: "Fun tapper games for math and writing!",
            title: "EduJam",
            topic: "",
            type: "app"
        ),
        metadata: Context.Metadata(
            keywords: ["math", "writing", "game"]
        )
    )

    let gameContexts: [Context] = // convert your activities to the JSON-friendly Context
    let node = ContextsRequest(contexts: [rootContext] + gameContexts)
    let encoder = JSONEncoder()
    encoder.outputFormatting = .prettyPrinted
    let jsonData = (try? encoder.encode(node)) ?? Data()
    let jsonStr = String(data: jsonData, encoding: .utf8) ?? ""
    print(jsonStr)
}
Create the JWT
You’ll need to create a private key first — follow the instructions in the above link and keep it in a safe spot.
Note: you’ll get the following error if you create your key before you register your App ID:
INVALID_IDENTIFIER_PATH: A context with the ‘identifierPath’:
does not start with an identifier that you have permission to manage.
So make sure you register your App ID before creating your ClassKit Catalog private key!
You have to specify how long the token is valid for and sign it using the ES-256 algorithm.
There’s a Swift package called Swift-JWT that makes this easy for us. You’ll need your developer team id and private key id to properly construct the JWT.
Here’s an example:
import Foundation
import SwiftJWT
// Your ClassKit Catalog Key ID
let header = Header(kid: "<insert key id>")
// iss = your Developer Team ID
// iat - start time when the JWT is valid
// exp - when the JWT expires
let claims = ClaimsStandardJWT(iss: "<insert team id>", exp: Date(timeIntervalSinceNow: 3600), iat: Date())
var jwt = JWT(header: header, claims: claims)
let privateKeyPath = URL(fileURLWithPath: "/Users/path/to/your-key.p8")
do {
let privateKey: Data = try Data(contentsOf: privateKeyPath, options: .alwaysMapped)
let signer = JWTSigner.es256(privateKey: privateKey)
let signedJWT = try jwt.sign(using: signer)
print(signedJWT)
} catch {
print(error)
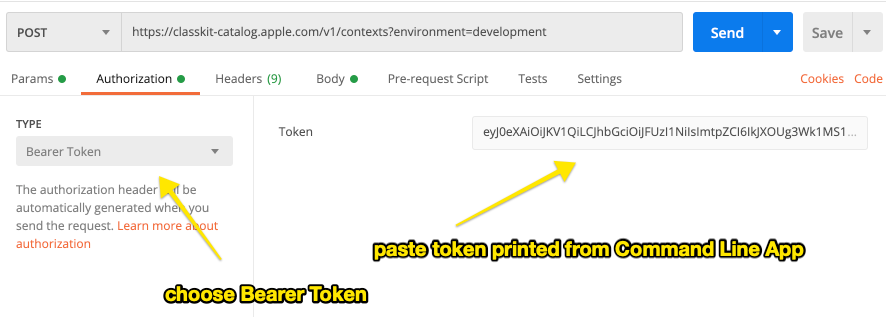
}I’ve uploaded it as a Swift Command Line Project if you want to play around with it yourself.
POST to Apple
With JSON and JWT in hand, we can start throwing data at Apple’s servers.
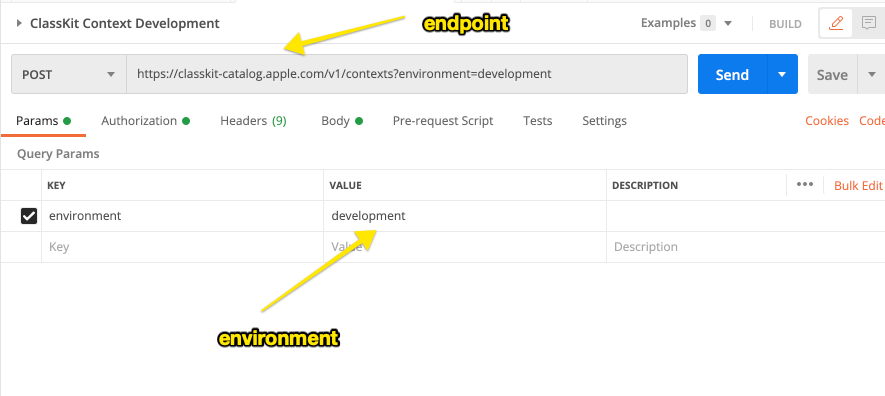
To create (and overwrite) contexts, we’ll use this endpoint: https://classkit-catalog.apple.com/v1/contexts
I love using Postman to send requests like this. It lets me save them for later and easily change variables.
Here’s what my Postman looks like for submitting to the ClassKit Catalog API:
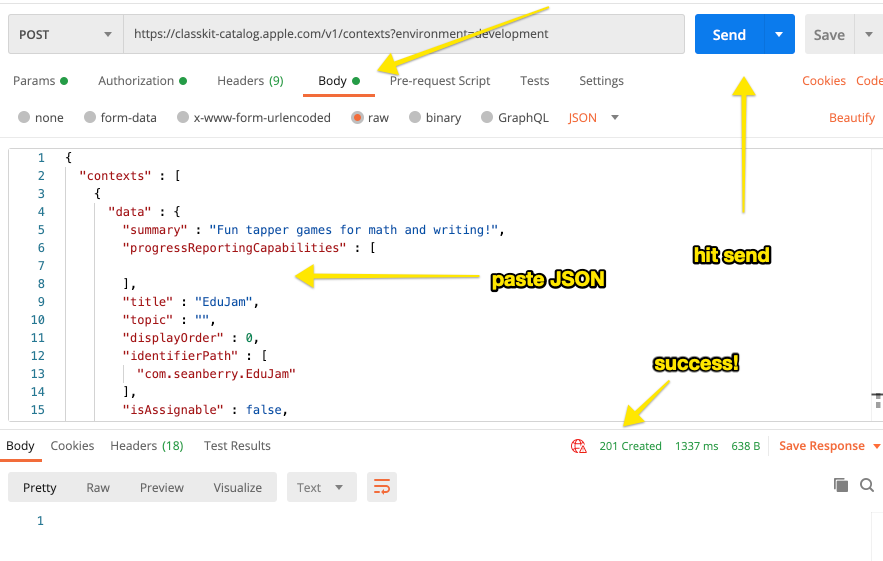
Note: if you want to remove an activity, you’ll have to use the Delete endpoint. Simply excluding an activity from the Create POST won’t remove it.
Test to see if it worked
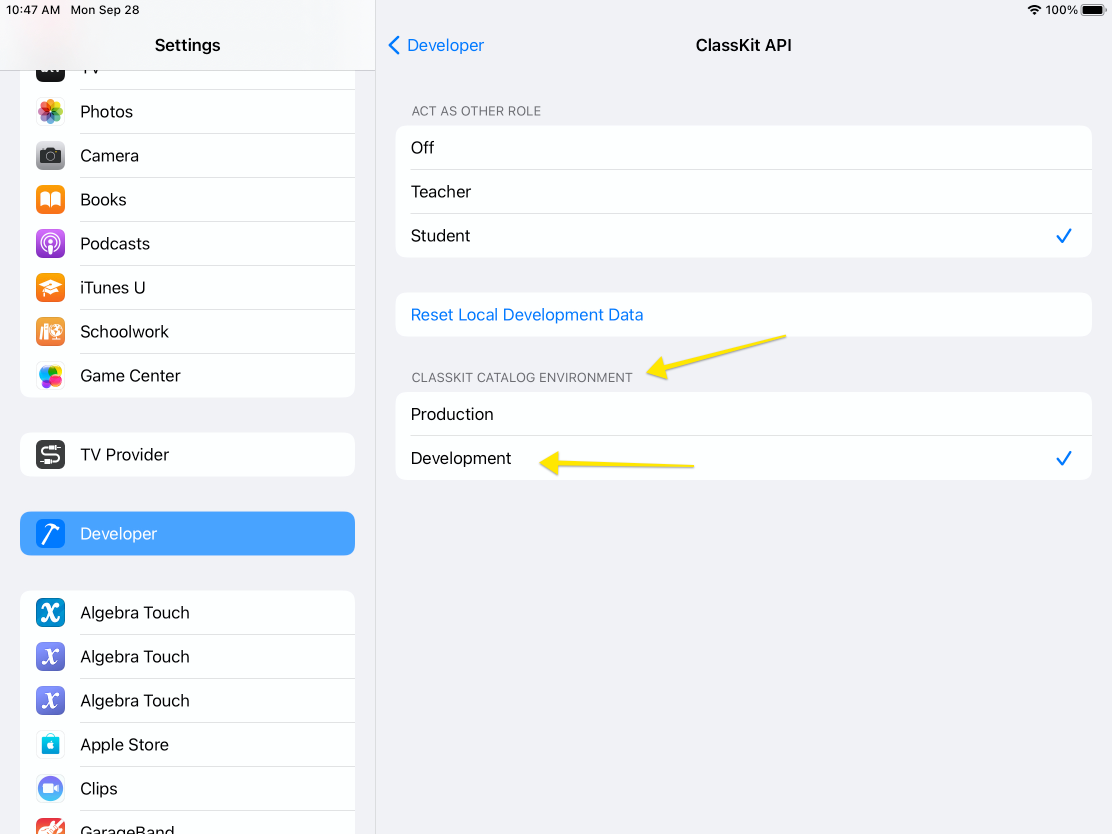
After a successful 201 response, make sure you’ve installed the latest version of Schoolwork and go back to Settings.app -> Developer->ClassKit.
Choose the ‘developer’ environment for ClassKit Catalog and then Reset the Local Development Data.
Your app will still need to be installed for the teacher to see activities, but Schoolwork will fetch them from their API now. Try it out!
Be sure to post your data to the ‘production’ environment before you release your app.
And that’s it! Your activities are more discoverable and will be exposed to teachers who are searching for keywords.
If you want to see my implementation of ClassKit activities, check out: Algebra Touch.